What are the roles and what they can do?
The roles have the following abilities within the teams that they belong to, unless otherwise noted:
View
This role is limited to viewing (no changes or additions) meetings and the specific items attached to that meeting (hyperlinked documents). If you have marked a document as confidential, it cannot be seen.
Submit
This role can do what View can as well as add or edit documents and create proposed agenda items for all of the teams. They cannot create or edit a meeting. This is intended for staff that provide documents or agenda items to the gatekeeper (clerk or secretary) so that they can enter their information themselves.
Edit
This role can do everything that Submit can do as well as create and edit meetings. This role is the gatekeeper (clerk or secretary) of the team who decides what proposed agenda items go on which meeting agendas.
Admin
This role can do everything that Edit can do plus add users, teams, letterheads, sections and templates. This is typically one person in the organization who manages the other teams and users.
What can a user with Submit Authority do?
A user with submit authority (submitter) can upload documents to the system and add agenda items (with out without attached documents) into the system. They cannot create, edit or publish a meeting agenda, but they can view data in the system. So, a submitter can create a proposed agenda item and optionally attach documents to it for the editor of the meeting agenda to add to a meeting agenda.
There are some fields that a submitter should include to make sure the agenda item will be noticed by the editor;
P.S. – the “Create Request” icon on the dashboard is specifically for submitters to go directly to the “Create and Agenda Item” screen where you can enter your item and documents!
Can a user be a member of more than one team?
Yes, once a user is added to the system, they can be added to any or all of the teams you have defined and they can server in different roles and have different authority levels on each team. When you add users to teams, you specify their role (authority) on that specific team. Someone could be the Chairman of one team with Edit Authority and a member of another with only View authority. This is up to the administrator to set in the system.
The title that a person holds on a team is entered on the letterhead for that team. So, when you add team members to a letterhead, or need to change them later, this is where you do that.
Is there a particular order that you have to enter data into CiviLink Documents?
Yes, to get the full functionality of the software before creating meeting agendas, you need to add the users that will be on the team that you are creating the agenda for, create the team and assign the users to it, create a letterhead for the team, create Agenda Sections and create one or more templates for the team.
After you create the team, use the Active Team dropdown box to select that team any time you are working on their data. Then add documents (optional), add agenda items and then add meeting agendas and add those agenda items to the meeting agendas.
How do I know what agenda items are waiting for me to add to a meeting agenda?
There are several fields that can help you know what agenda items are waiting for you to add to a meeting agenda:
Can I create a reminder for an event in the future that I need to take care of or include in a meeting?
Yes, you can create an agenda item and check the Pending box, then on that screen, enter a date in the “Requested Approval Date” field. Of course, you can enter whatever other information is useful in this screen. Then, when you are searching for Agenda Items to include on meeting agendas in the future, this will be a pending item will be listed with the appropriate date for you to choose from.
Alternatively, you can use reoccurring copies make new copy(s) of the agenda item(s) and the copy will have a new requested date. Either method will make an item show up on your pending items list.
If I have an item that I have to periodically deal with (monthly, quarterly, annually) can I set up reminders for that?
Yes, once you have the Agenda Item entered in the system, you can click the ellipses to the right of that item on the Agenda Items screen. This will open the Actions menu and you can select “Reoccurring Copies” from that menu. This will open the “Reoccurring Agenda Item” screen where you can set how many times you want this item repeated and now far apart. When you create the copies, they will have the “Pending” flag set and the “Requested Approval Date” will be set to date(s) that you specified. Then when you review the pending Agenda Items to see what you need to include in future meetings, these items will show up in the list to choose from, reminding you to add them to a meeting.
Note: When an item with the Pending flag is added to an agenda, the Pending flag is reset because it is now scheduled to be dealt with. That way, it does not show up for meetings after it has been included in one.
If I have a specific type of meeting periodically (weekly, monthly, quarterly, annually) can I copy it for future use?
Yes, when you have created a meeting and it has all the items that you want to include in a future meeting(s), on the Meetings screen, click on the ellipses to the right of the meeting. This will open the Actions menu. Select “Reoccurring Copies” from that menu. This will open the Reoccurring Meeting screen where you can specify how many copies to make and their spacing. When you create copies this way, you get new meetings at the dates specified with agendas that are copies of the source meeting.
After you have used the software for a while and you have the agenda items standardized, this is a quick way to repeat a meeting, but remember, if you include in the source items like prior meeting minutes that change each meeting, they will show up in the copies as well. Start by copying one meeting and check how that works before making many copies.
If I end up on a screen that does not have a Save/Cancel or Go Back button, how do I get back to the prior screen?
At the top left of each screen (to the right of the Home menu option) is an display of where you are in the software screens. For example it may say “Pawnee County > Meetings > Commissioners Meeting”. This is called the breadcrumbs. Each of the pieces of text separated by the greater than signs is a hyperlink. If you place your cursor over the text, you will see an underline displayed. If you click on this text, it will take you to the screen that is appropriate for that level. For example, clicking on “Meetings” will take you to the meetings screen. If you need to get to a higher level screen, you can click on one of these hyperlinks to get there.
If I have more than one organization or team, how do I switch between them?
There are several ways.
You can click on the Home button, find the organization you want to work on and select the appropriate team, and then the organization and team will be set when you go to the dashboard screen.
Alternatively, there are dropdown boxes at the top right of the screen. One is the “Active Organization”, then the “Active Team” and finally the “Active Role”. At any time you can select the organization and then the team you wish to work in from these dropdown boxes.
The “Active Role” box shows you the level of authority you have within that team. You can downgrade your authority (Admin > Edit > Submit > View) but you cannot exceed the authority set by the administrator for your account on the organization/team selected. Downgrading your authority can help you test what others would be able to do if they were logged into the system.
Why does the lock icon appear with some documents and the hyperlink to that document does not work?
The lock icon indicates that the document has been identified as confidential (a checkbox on the document screen). This feature allows documents to be added to the system that are not required or intended to be shared with the public. Logged in users of the system can still view the document by going to the document screen, finding it and selecting view from the Actions menu. If this document should be shared with the public, the confidentiality box can be turned off by users that have Submit, Edit or Admin authority.
Why is the plus button for creating new meetings dimmed out?
Check your Active Team dropdown box at the top right of the screen. If it says Full Organization, you will need to select a specific team where you have Edit or Admin authority before you can create a new meeting. If the Active Team dropdown box does show the specific team you want, the Active Role dropdown must say Edit or Admin for you to be able to create a new meeting. View and Submit users do not have the authority to create new meetings.
What happens when I publish a meeting agenda?
When publishing a meeting:
After a meeting is published:
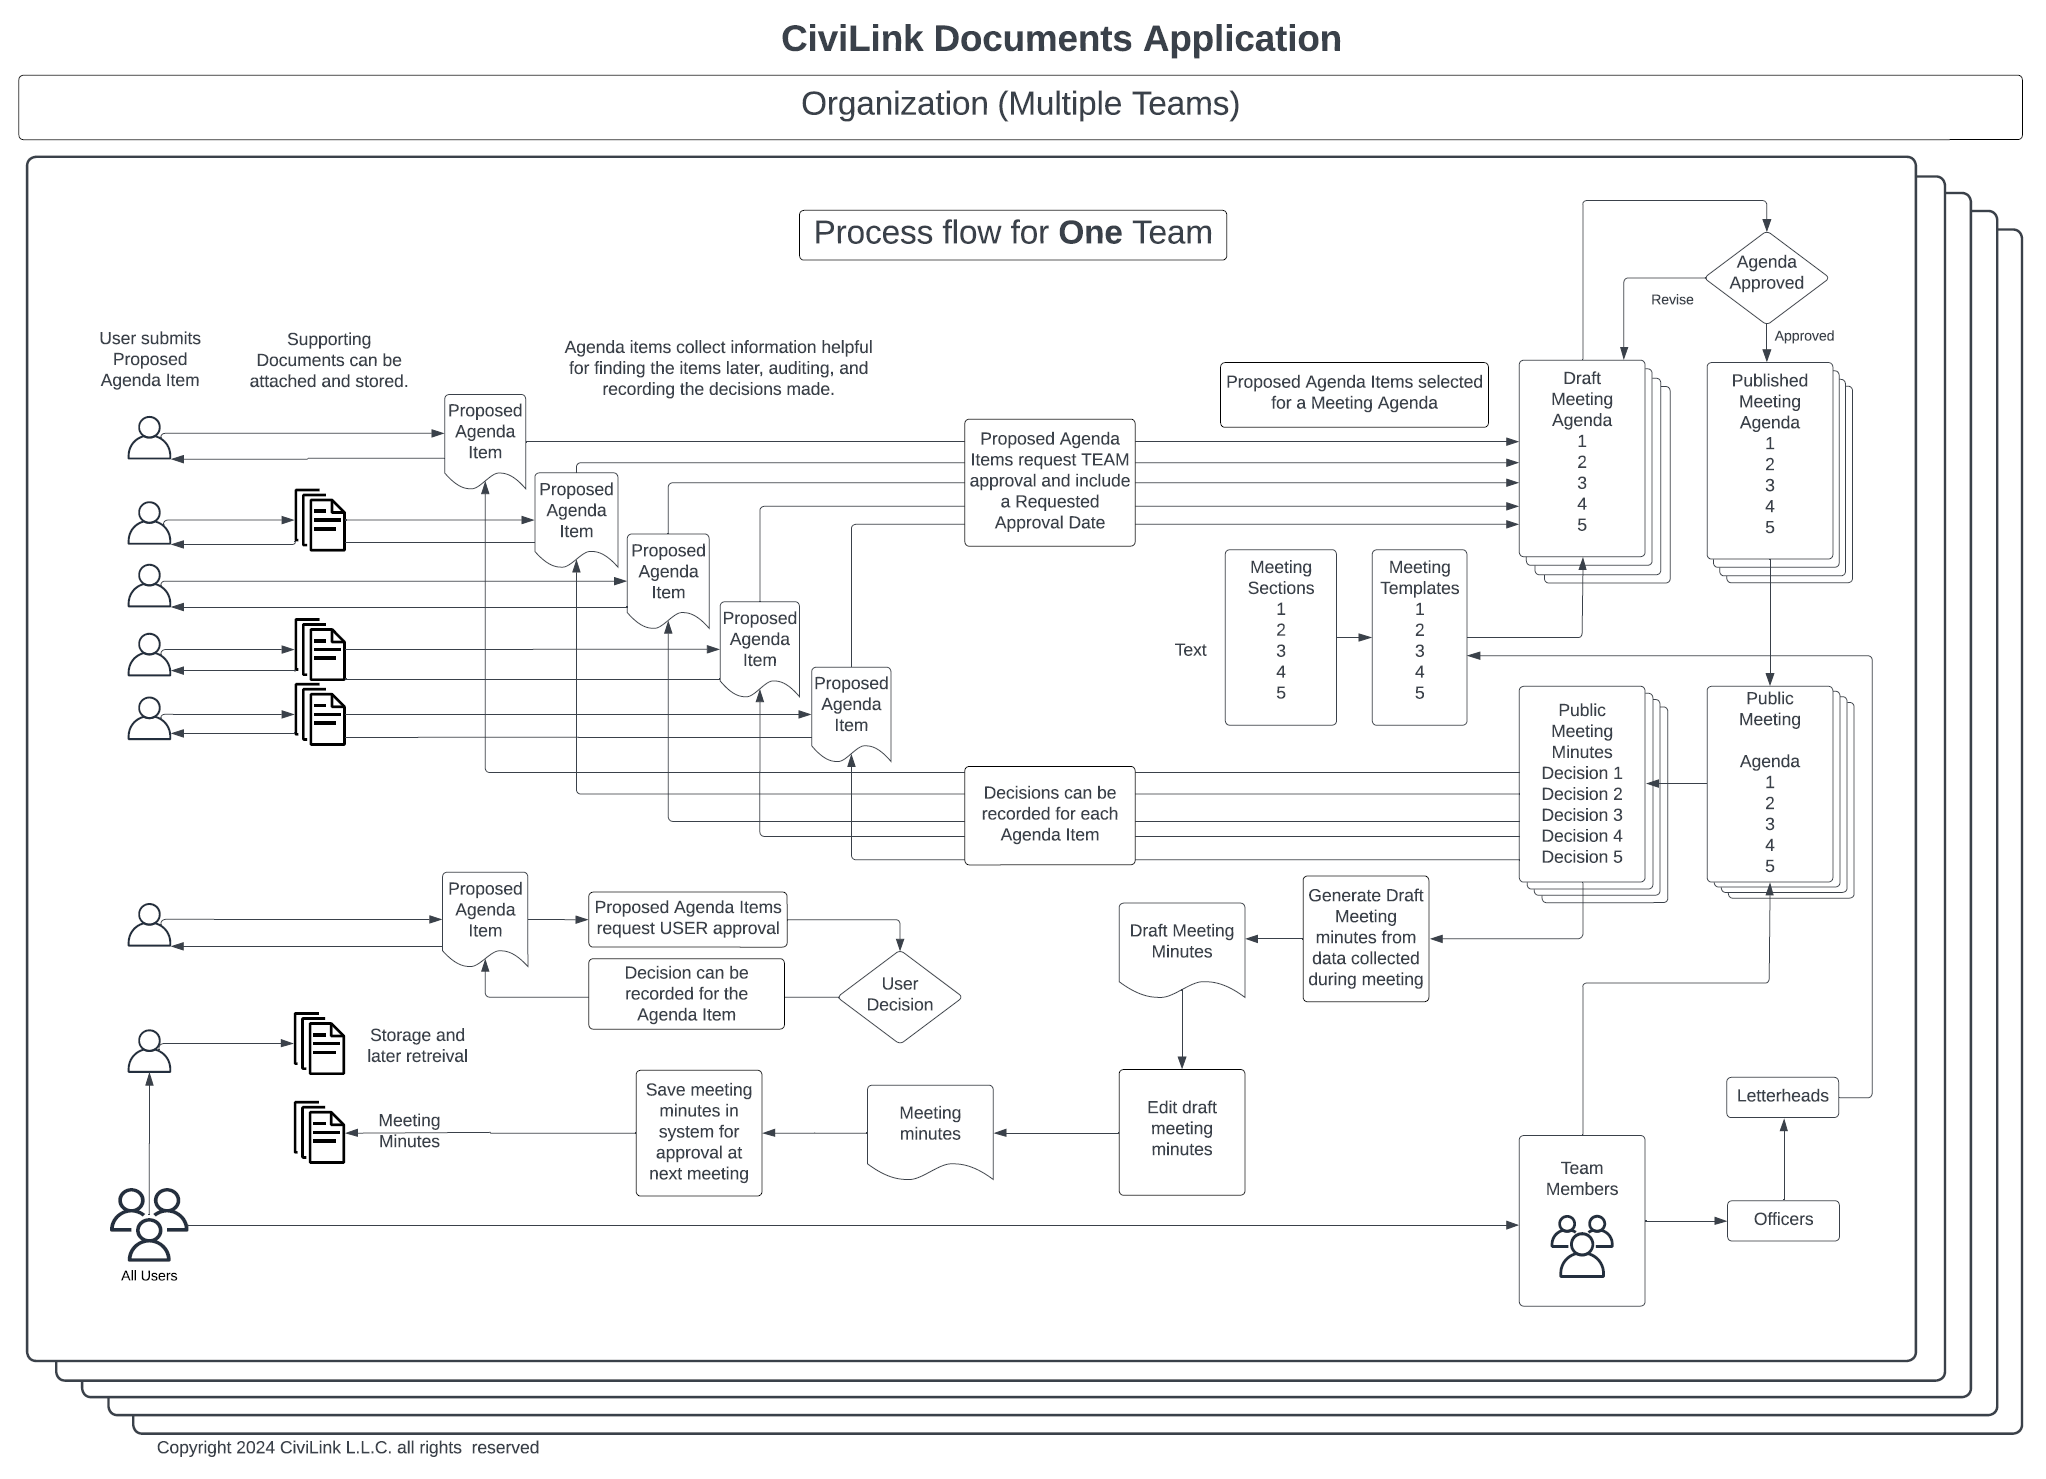
What elements of the meeting agenda come from what sections of the software?
The diagram below shows where the elements of the meeting agenda come from.

This diagram is part of the CiviLink Documents Overview video.
Can I find the meeting that an agenda item was voted on?
Yes, go to the Agenda Items screen and use the filters and sorts to find the Agenda Item you are looking for. There is a column called “Agenda Sections Used in” that lists the Agenda Sections that this Agenda Item is attached to. There may be multiple links depending on the Agenda Item. This text is hyperlinked to the Agenda Section. When you click on it, a screen will be displayed that shows the Agenda Section, Agenda Item and Meeting. If there is no meeting that this Agenda Section is used on, the meeting will be blank. You may also see Tags with dates on some of the items that can be used to find when an Item was to be included on an agenda. Below is an example of what that screen looks like:

Note the “Meeting Used On” section. You can use the [View] button to see more details about that meeting.
I have multiple templates that use a common section. If I change the section for one, it changes it for the others. How do I make a change that only affects only the one template?
If a template section is common to more than one template and you want to make a change to just one template and leave the others alone, you need to create a separate section for the template you want to change. You can create sections that have identical names, but then you need some way to tell them apart. To do this, apply a tag to each so you can tell the difference. Then edit the templates and include one section in one template and the other in other template(s).
What is the overall flow of information within CiviLink Documents?
The following chart shows the flow of information through the CiviLink Documents system:
Note the process starts with users entering documents and Agenda Items into the system.
When a change in the board members approach, should I make a new letterhead/template or edit the existing one?
This depends on a few things, so you need to consider a couple of questions.
Q1) Will two meeting agendas need to be published with different board members simultaneously?
Q2) Will there be time between meetings of the board to make the change? Often boards have a reorganizational meeting right after their swearing in.
Q1 = No, and Q2 = No: Then you should make a new letterhead in advance of the change and use it for the later meeting.
Q1 = No, and Q2 = Yes: Then you can just edit the team and letterhead at the appropriate time (after the last meeting of the existing board).
Q1 = Yes and Q2 = Yes or No: Then you should make a new letterhead in advance of the change and use it for the later meeting.
Note that the letterhead is specified in the Template, so will also have to copy the template and change the letterhead before you can apply it to a new meeting.
Note that this approach allows for templates to be edited and the changes to show up on meetings that the letterhead is applied to. But, because past meeting agendas could be updated with an incorrect letterhead, editing a past meeting agenda is locked after that meeting's minutes are saved.
Typically as you approach the end of the year, you will want to add new board members as users in CiviDocs and then add them to the board they were elected/appointed as non-voting members. This would make them visible for attendance but not as voting member. Then after the last meeting of the old board, remove the members leaving from the board (and optionally as users) and change the new members from non-voting to voting. If you have back to back meetings such that there is no time to make this change, then add the new members as voting members and when running the meetings select who is eligible to vote on the fly with non-eligible members abstaining.
Following the last meeting of the old board, update the letterhead with the new members and update the titles to reflect the new officers if there was a change. If you prefer to create a new letterhead for the coming year ahead of time, don't forget to update your meeting templates where the letterhead is specified. You will want to do this prior to creating all of the meetings for the year (if you plan to do that).
How does the meeting editor work?
In the meeting editor there is an edit mode and a view mode. The button at the top left allows you to switch back and forth between these modes. This lets meeting attenders view the agenda without editing it.
When you are in View mode, there is a check box titled Additional Details. If checked, the Staff Comments, Script, Presenter, and Motion fields for each agenda item are displayed if they are filled in. This provides board members with additional information during the meeting.
The Preview button lets you see what the published agenda will look like with the letterhead attached. It also has an Additional Details checkbox. In the preview screen there are icons that let you download and print the agenda you are looking at.
When you are editing the agenda, holding your mouse cursor over and item will display icons that let you edit that item. If your mouse is not over an item, these icons are not displayed.
You can insert sections/agenda items/documents from existing templates. If your agenda is empty, then there is a template dropdown list at the top left of the editing screen. When you have selected a template, it will be displayed. When you have selected the one you want, click [Use Template].
Sections and agenda items can be moved around in the agenda by clicking on the six-dot icon and dragging it to where you want it to go. A bar will appear showing the destination point. Letting go of the item drops it there. Agenda items can be dragged to different sections if desired.
Documents can be reordered within an agenda item using the same drag and drop method. They cannot be moved to a different agenda item this way.
Holding your cursor over an existing item displays icons that allow your to edit (Pencil), delete (X), Add an existing item (down arrow) or insert a new item (+). These icons change a bit depending on what your mouse is over, but the theme is similar.
The "S" with a circle in the middle represents a section. the Box with a checkmark represents an agenda item and the Page represents a CiviDocs document.
Note that you can create a CiviDocs document without attaching a file to it as a place holder for attaching a file. The icon preceding the name of the CiviDocs document will show a broken chain link until you do attach a file. It may also show a lock icon if the document is marked confidential.
Note that you can insert the same agenda item multiple times in an agenda but this may have odd results (e.g. a Public Comments agenda item), so it is best practice not to do that (e.g. Use "Agenda Public Comments" and "Generic Public Comments" instead).
When your cursor is not over and agenda item, you will see either a check mark or a greater than symbol. These indicate if the agenda item needs to be voted on (Check mark) or no approval is required (>). This lets you quickly see if you have the right settings before running the meeting.
When you click an icon with a down arrow, a dialog box for selecting that type of item (section, agenda item, document) will be displayed. If you find that you do not have the item you are looking for, use the icon with the "+" to create a new one and add it in.
When you click on icon with a "+" sign, a dialog box with for creating an new item (section, agenda item, document) will be displayed. Enter the data in this dialog box and press [Save] to add it to your agenda.
New items are added at the bottom of the item you have selected. New sections are added after the current section, new agenda items are added at the end of this section and new documents are added to the end of the list of documents in an agenda item.
If you want to re-order these things, see the instructions above about the six-dot icon.
There is a video describing these functions in the Help section.


